How to run external codes#
This how-to walks you through the steps of setting up a (possibly remote) compute resource, setting up a code on that computer, and submitting a calculation through AiiDA (similar to the introductory tutorial, but in more detail).
To run an external code with AiiDA, you need an appropriate calculation plugin. In the following, we assume that a plugin for your code is already available from the aiida plugin registry and installed on your machine. Refer to the How to install plugins section for details on how to install an existing plugin. If a plugin for your code is not yet available, see How to write a plugin for an external code.
Throughout the process, you will be prompted for information on the computer and code. In these prompts:
Type
?followed by<enter>to get help on what is being asked at any prompt.Press
<CTRL>+Cat any moment to abort the setup process. Your AiiDA database will remain unmodified.
Note
The verdi commands use readline extensions to provide default answers, which require an advanced terminal.
Use a standard terminal – terminals embedded in some text editors (such as emacs) have been known to cause problems.
How to set up a computer#
A Computer in AiiDA denotes a computational resource on which you will run your calculations.
It can either be:
the machine where AiiDA is installed or
any machine that is accessible via SSH from the machine where AiiDA is installed (possibly via a proxy server).
The second option allows managing multiple remote compute resources (including HPC clusters and cloud services) from the same AiiDA installation and moving computational jobs between them.
Note
The second option requires access through an SSH keypair. If your compute resource demands two-factor authentication, you may need to install AiiDA directly on the compute resource instead.
Computer requirements#
Each computer must satisfy the following requirements:
It runs a Unix-like operating system (Linux distros and MacOS should work fine)
It has
bashinstalled(optional) It has batch scheduler installed (see the list of supported schedulers)
If you are configuring a remote computer, start by configuring password-less SSH access to it.
Note
AiiDA will use bash on the remote computer, regardless of the default shell.
Please ensure that your remote bash configuration does not load a different shell.
Computer setup#
The configuration of computers happens in two steps: setting up the public metadata associated with the Computer in AiiDA provenance graphs, and configuring private connection details.
Start by creating a new computer instance in the database:
$ verdi computer setup
At the end, the command will open your default editor on a file containing a summary of the configuration up to this point.
You can add bash commands that will be executed
before the actual execution of the job (under ‘Pre-execution script’), and
after the script submission (under ‘Post execution script’).
Use these additional lines to perform any further set up of the environment on the computer, for example loading modules or exporting environment variables:
export NEWVAR=1
source some/file
Note
Don’t specify settings here that are specific to a code or calculation: you can set further pre-execution commands at the Code and even CalcJob level.
When you are done editing, save and quit. The computer has now been created in the database but you still need to configure access to it using your credentials.
Tip
In order to avoid having to retype the setup information the next time around, you can provide some (or all) of the information via a configuration file:
$ verdi computer setup --config computer.yml
where computer.yml is a configuration file in the YAML format.
This file contains the information in a series of key-value pairs:
---
label: "localhost"
hostname: "localhost"
transport: "core.local"
scheduler: "core.direct"
work_dir: "/home/max/.aiida_run"
mpirun_command: "mpirun -np {tot_num_mpiprocs}"
mpiprocs_per_machine: "2"
prepend_text: |
    module load mymodule
    export NEWVAR=1
The list of the keys for the yaml file is given by the options of the computer setup command:
$ verdi computer setup --help
Note: remove the -- prefix and replace dashes (-) within the keys with an underscore ( _ ).
Computer connection configuration#
The second step configures private connection details using:
$ verdi computer configure TRANSPORTTYPE COMPUTERLABEL
Replace COMPUTERLABEL with the computer label chosen during the setup and replace TRANSPORTTYPE with the name of chosen transport type, i.e., core.local for the localhost computer and core.ssh for any remote computer.
After the setup and configuration have been completed, let’s check that everything is working properly:
$ verdi computer test COMPUTERNAME
This command will perform various tests to make sure that AiiDA can connect to the computer, create new files in the scratch directory, retrieve files and query the job scheduler.
Mitigating connection overloads#
Some compute resources, particularly large supercomputing centers, may not tolerate submitting too many jobs at once, executing scheduler commands too frequently, or opening too many SSH connections.
Limit the number of jobs in the queue.
Set a limit for the maximum number of workflows to submit, and only submit new ones once previous workflows start to complete. The supported number of jobs depends on the supercomputer configuration which may be documented as part of the center’s user documentation. The supercomputer administrators may also find the information found on this page useful.
Increase the time interval between polling the job queue.
The time interval (in seconds) can be set through the Python API by loading the corresponding
Computernode, e.g. in theverdi shell:load_computer('fidis').set_minimum_job_poll_interval(30.0)
Increase the connection cooldown time.
This is the minimum time (in seconds) to wait between opening a new connection. Modify it for an existing computer using:
verdi computer configure core.ssh --non-interactive --safe-interval <SECONDS> <COMPUTER_NAME>
Important
The two intervals apply per daemon worker, i.e. doubling the number of workers may end up putting twice the load on the remote computer.
Managing your computers#
Fully configured computers can be listed with:
$ verdi computer list
To get detailed information on the specific computer named COMPUTERLABEL:
$ verdi computer show COMPUTERLABEL
To rename a computer or remove it from the database:
$ verdi computer rename OLDCOMPUTERLABEL NEWCOMPUTERLABEL
$ verdi computer delete COMPUTERLABEL
Note
Before deleting a Computer, you will need to delete all nodes linked to it (e.g. any CalcJob and RemoteData nodes).
Otherwise, AiiDA will prevent you from doing so in order to preserve provenance.
If a remote machine is under maintenance (or no longer operational), you may want to disable the corresponding Computer.
Doing so will prevent AiiDA from connecting to the given computer to check the state of calculations or to submit new calculations.
$ verdi computer disable COMPUTERLABEL
$ verdi computer enable COMPUTERLABEL
How to create a code#
Before you can run a calculation, you need to define a “code” which represents what code the calculation should execute and how it should be executed. AiiDA supports a variety of codes:
Installed: The executable code is already installed on the target computerPortable: The executable code is stored by AiiDA and can be deployed on a variety of computersContainerized: The executable code is part of a container image that can be deployed and run on the target computer
Each of these scenarios are supported through a code plugin, which stores all necessary data to fully define the code. A configured code is stored in the provenance graph, which besides being important for reproducibility, makes it easy to query for all calculations that were run with a given code.
Note
In most cases, it is advisable to install the executables to be used by AiiDA on the target machine before submitting calculations using them, in order to take advantage of the compilers and libraries present on the target machine.
This is the installed scenario.
Occasionally, you may need to run small, reasonably machine-independent scripts (e.g. Python or bash), and copying them manually to a number of different target computers can be tedious.
For this use case, the portable code is ideal.
The executable and associated files of the code are stored by AiiDA and automatically copied to the target computer for every execution.
Do not use local codes as a way of encapsulating the environment of complex executables.
For this use case, it is best to use the containerized code.
Create a container of the required compute environment and create a containerized code.
A new code can be configured in AiiDA through the verdi code create command.
The type of code is specified as the first argument and the rest of the information is provided through options:
The following example shows how to create an installed code for the bash binary on the localhost computer:
verdi code create core.code.installed \
    --label installed-code \
    --computer localhost \
    --filepath-executable /usr/bin/bash
For more information, please refer to the dedicated topic section.
The following example shows how to create a portable code for an executable executable.py in the /path/to/directory folder:
verdi code create core.code.portable \
    --label portable-code \
    --filepath-files /path/to/directory \
    --filepath-executable executable.py
Any other files that are part of /path/to/directory will also be stored by the code plugin.
For more information, please refer to the dedicated topic section.
The following example shows how to setup running bash in a base Docker container through Singularity to be run on the Computer named some-computer:
verdi code create core.code.containerized \
    --non-interactive \
    --label containerized-code \
    --computer some-computer \
    --filepath-executable "/bin/sh" \
    --image-name "docker://alpine:3" \
    --engine-command "singularity exec --bind $PWD:$PWD {image_name}"
For more information, please refer to the dedicated topic section.
The code create command will prompt for any additional options.
It will also open a text editor to specify the --prepend-text and --append-text options, where you can include bash commands that will be executed
before running the submission script (after the ‘Pre execution script’ lines), and
after running the submission script (after the ‘Post execution script’ separator).
Use this, for instance, to load modules or set variables that are needed by the code, such as:
module load intelmpi
At the end, you receive a confirmation, with the PK and the UUID of your new code.
Tip
The verdi code create command performs minimal checks in order to keep it performant and not rely on an internet connection.
If you want additional checks to verify the code is properly configured and usable, run the verdi code test command.
For installed codes for example, this will check whether the associated computer can be connected to and whether the specified executable exists.
Look at the command help to see what other checks may be run.
Tip
Analogous to a computer setup, some (or all) the information described above can be provided via a configuration file:
$ verdi code create core.code.installed --config code.yml
where code.yml is a configuration file in the YAML format.
This file contains the information in a series of key:value pairs:
---
label: 'qe-6.3-pw'
description: 'quantum_espresso v6.3'
default_calc_job_plugin: 'quantumespresso.pw'
filepath_executable: '/path/to/code/pw.x'
computer: 'localhost'
prepend_text: |
   module load module1
   module load module2
append_text: ' '
The list of the keys for the yaml file is given by the available options of the code create sub-command:
$ verdi code create core.code.installed --help
Note: remove the -- prefix and replace dashes (-) within the keys with an underscore ( _ ).
Note
It is possible to run codes that are provided by a Conda environment. The code configuration YAML would look something like the following:
filepath_executable: 'executable-name'
prepend_text: conda activate environment-name
Note that the configuration is not complete but only shows the relevant lines.
For the conda activate statement to work, it needs to be properly initialized in the shell in which the job is executed.
This can be achieved by configuring the shebang property of the Computer to #!/bin/bash -l.
This ensures that the submission script uses a login shell which initializes conda properly.
If the submission script should not use a login shell (e.g. because that sources other dotfiles that are unnecessary), the following prepend_text can be used instead:
filepath_executable: 'executable-name'
prepend_text: |
    eval "$(conda shell.bash hook)"
    conda activate environment-name
For further details, please refer to the Conda documentation.
Managing codes#
You can change the label of a code by using the following command:
$ verdi code relabel <IDENTIFIER> "new-label"
where <IDENTIFIER> can be the numeric PK, the UUID or the label of the code (either label or label@computername) if the label is unique.
You can also list all available codes and their identifiers with:
$ verdi code list
which also accepts flags to filter only codes on a given computer, or only codes using a specific plugin, etc. (use the -h option).
You can get the information of a specific code with:
$ verdi code show <IDENTIFIER>
Finally, to delete a code use:
$ verdi code delete <IDENTIFIER>
(only if it wasn’t used by any calculation, otherwise an exception is raised).
Note
Codes are a subclass of Node and, as such, you can attach extras to a code, for example:
load_code('<IDENTIFIER>').base.extras.set('version', '6.1')
load_code('<IDENTIFIER>').base.extras.set('family', 'cp2k')
These can be useful for querying, for instance in order to find all runs done with the CP2K code of version 6.1 or later.
How to submit a calculation#
After setting up your computer and setting up your code, you are ready to launch your calculations!
Make sure the daemon is running:
verdi daemon status
Figure out which inputs your
CalcJobplugin needs, e.g. using:verdi plugin list aiida.calculations core.arithmetic.add
Write a
submit.pyscript:from aiida.engine import submit code = load_code('add@localhost') builder = code.get_builder() builder.x = Int(4) builder.y = Int(5) builder.metadata.options.withmpi = False builder.metadata.options.resources = { 'num_machines': 1, 'num_mpiprocs_per_machine': 1, } builder.metadata.description = "My first calculation." print(submit(builder))
Of course, the code label and builder inputs need to be adapted to your code and calculation.
Note
See also the complete list of metadata you can pass to a calculation.
Submit your calculation to the AiiDA daemon:
verdi run submit.py
After this, use
verdi process listto monitor the status of the calculations.
Tip
If you ever need to resubmit a previous calculation with modified inputs, you can get a pre-populated copy of its process builder with
builder = load_node(<IDENTIFIER>).get_builder_restart()
# If needed, the builder can now be modified as usual before being run or submitted
submit(builder)
where <IDENTIFIER> is the PK or UUID (or label) of your calculation.
See Launching processes and Monitoring processes for more details.
How to monitor (and prematurely stop) a calculation#
A calculation job will terminate if and only if:
The calculation terminates; either nominally or due to an error.
The scheduler kills the job; e.g., due to the wallclock time being exceeded or the allocated memory being exhausted.
The calculation job is killed through AiiDA
One might want to kill the calculation job if it seems that the calculation is not going anywhere, and so instead of letting the calculation run to its end automatically, it is killed. It is possible to automate this procedure through monitoring of the calculation job.
A monitor is a Python function that will be called in regular intervals while the calculation job is running. The function has access to the working directory of the running calculation and can retrieve and inspect their contents. Based on the output it can decide whether the job should continue running or should be killed.
How to implement a monitor#
A monitor is a function with the following signature:
from aiida.orm import CalcJobNode
from aiida.transports import Transport

def monitor(node: CalcJobNode, transport: Transport) -> str | None:
    """Retrieve and inspect files in working directory of job to determine whether the job should be killed.

    :param node: The node representing the calculation job.
    :param transport: The transport that can be used to retrieve files from remote working directory.
    :returns: A string if the job should be killed, `None` otherwise.
    """
The node and the transport arguments are required.
The node is a reference to the calculation job node, which can be used to retrieve its input, for example.
The transport can be used to retrieve files from the working directory of the calculation running on the remote computer.
This allows you to inspect the content and determine whether the job should be prematurely killed.
A monitor can define additional keyword arguments that a user can use to modify or configure its behavior.
The arguments can take any value, as long as it is JSON-serializable.
This is necessary because the arguments that are passed to a monitor are stored in the database in order to preserve provenance.
It is recommended to write out each supported keyword argument and not use the **kwargs catch-all, for example:
from aiida.orm import CalcJobNode
from aiida.transports import Transport

def monitor(node: CalcJobNode, transport: Transport, custom_keyword: bool = False) -> str | None:
    """Retrieve and inspect files in working directory of job to determine whether the job should be killed.

    :param node: The node representing the calculation job.
    :param transport: The transport that can be used to retrieve files from remote working directory.
    :param custom_keyword: Optional keyword, when set to ``True`` will do something different.
    :returns: A string if the job should be killed, `None` otherwise.
    """
This will allow the engine to validate the arguments provided by a user. If unsupported arguments are provided to a monitor, the calculation job will not start and the user will be notified of the mistake.
As an example case, imagine a code that would print the string WARNING to stdout, in which case we want to stop the calculation. The following implementation would accomplish that:
import tempfile
from aiida.orm import CalcJobNode
from aiida.transports import Transport

def monitor(node: CalcJobNode, transport: Transport) -> str | None:
    """Retrieve and inspect files in working directory of job to determine whether the job should be killed.

    :param node: The node representing the calculation job.
    :param transport: The transport that can be used to retrieve files from remote working directory.
    :returns: A string if the job should be killed, `None` otherwise.
    """
    with tempfile.NamedTemporaryFile('w+') as handle:
        transport.getfile(node.options.output_filename, handle.name)
        handle.seek(0)
        output = handle.read()

    if 'WARNING' in output:
        return 'Detected the string `WARNING` in the output file.'
The content of the stdout stream, which should be written to the node.options.output_filename file, is retrieved using transport.getfile and is written to a temporary file on the local file system.
The content is then read from the file and if the target string is detected, an error message is returned.
If a monitor, attached to a calculation job, returns anything other than None, the calculation job will be killed by the engine.
Finally, the monitor needs to be declared using an entry point in the aiida.calculations.monitors group.
The next section will show how this entry point is used to assign it to a calculation job.
Added in version 2.5.0: Monitors can now attach outputs to calculation
Monitors can also attach outputs to the calculation that it is monitoring.
This can be useful to report outputs while the calculation is running that should still be stored permanently in the provenance graph.
In the following example, a simple monitor is implemented that returns a CalcJobMonitorResult that defines a dictionary of output nodes:
from aiida.orm import CalcJobNode
from aiida.transports import Transport

def monitor(node: CalcJobNode, transport: Transport) -> CalcJobMonitorResult:
    """Return a dictionary of output nodes to be attached to the calculation to which the monitor is attached."""
    import secrets
    return CalcJobMonitorResult(
        outputs={
            'some_output': Int(2),
            'messages': {
                f'key_{secrets.token_hex(4)}': Str('some random message')
            }
        }
    )
Once the monitor returns, the engine will loop over the nodes in the outputs dictionary and attach them to the calculation node.
Note that the CalcJob class of course needs to specify this output port in the output namespace, otherwise an exception is raised.
How to assign a monitor#
A monitor can be assigned to a calculation job by adding it to the monitors input. It takes a dictionary of monitors, where each monitor is defined by a Dict node with the following keys:
monitor = Dict({
    'entry_point': 'some.monitor'
})
The entry_point key is required and should contain an entry point that refers to a monitor function registered in the aiida.calculations.monitors group. It is possible to assign multiple monitors to a single calculation:
builder = code.get_builder()
builder.monitors = {
    'monitor_a': Dict({'entry_point': 'some.monitor'}),
    'monitor_b': Dict({'entry_point': 'some.other.monitor'}),
}
Note that the keys used in the monitors input can be any valid attribute name and does not influence the behavior whatsoever.
If a monitor supports additional custom keyword arguments, these should be passed as a dictionary under the kwargs key.
For example, if the monitor accepts a boolean value for the keyword custom_keyword, it can be specified as follows:
builder = code.get_builder()
builder.monitors = {
    'monitor_a': Dict({'entry_point': 'some.monitor', 'kwargs': {'custom_keyword': True}}),
}
If a keyword is specified that is not declared explicitly by the monitor, the validation of the CalcJob will fail.
Monitor execution order#
By default, the monitors are executed in alphabetical order based on their keys in the monitors input namespace.
The order can be controlled using the priority key in the monitors input.
builder.monitors = {
    'monitor_one': Dict({'entry_point': 'entry_point_one', 'priority': 100})
    'monitor_one': Dict({'entry_point': 'entry_point_one'})
}
Higher priorities will be executed first.
It is not necessary to define a priority for all monitors, in the absence of a priority, a priority of 0 is assumed.
For monitors with identical priority, the order remains alphabetical based on their key in the monitors input namespace.
Monitor execution frequency#
By default, all monitors are executed during each scheduler update cycle.
This interval is controlled by the minimum_scheduler_poll_interval property of the Computer, which can be retrieved and set through the get_minimum_job_poll_interval and set_minimum_job_poll_interval, respectively.
The frequency of monitor execution can be reduced by setting a larger interval for the minimum_poll_interval key in the monitor input definition:
builder.monitors = {
    'monitor_one': Dict({'entry_point': 'entry_point_one', 'minimum_poll_interval': 600})
}
The engine will guarantee that the interval between calls of the monitor is at least the value specified by minimum_poll_interval.
Due to a number of other intervals that are part of the CalcJob pipeline, it is possible however, that the effective interval between monitor calls will be larger than that.
Advanced functionality#
The most simple implementation of a monitor simply returns a string.
This is interpreted by the engine that the job should be killed and the string contains the reason for doing so.
This behavior can be controlled by returning an instance of CalcJobMonitorResult instead.
Disable parsing of retrieved files#
By default, when a job is stopped through a monitor, the engine will still retrieve and parse the files.
To skip the parsing of the retrieved files, set CalcJobMonitorResult.parse to False:
def monitor_skip_parsing(node: CalcJobNode, transport: Transport) -> str | None:
    """Kill the job and do not call the parser, if specified in the inputs."""
    from aiida.engine.processes.calcjobs.monitors import CalcJobMonitorResult
    return CalcJobMonitorResult(parse=False)
Disable retrieving of files#
By default, when a job is stopped through a monitor, the engine will still retrieve the files from the remote working directory.
To skip the file retrieval, set CalcJobMonitorResult.retrieve to False:
def monitor_skip_retrieval(node: CalcJobNode, transport: Transport) -> str | None:
    """Kill the job and do not retrieve the output files."""
    from aiida.engine.processes.calcjobs.monitors import CalcJobMonitorResult
    return CalcJobMonitorResult(retrieve=False, parse=False)
Note that in this case parse should also be set to False since the engine cannot parse files that have not been retrieved.
Disable overriding of parse exit code#
By default, when a job is stopped through a monitor, the engine will set the exit code STOPPED_BY_MONITOR.
This overrides any exit code that may be returned by the parser, if one is invoked.
To keep the exit code of the parser instead, set CalcJobMonitorResult.override_exit_code to False:
def monitor_do_not_override_exit_code(node: CalcJobNode, transport: Transport) -> str | None:
    """Kill the job and do not override the exit code returned by the parser."""
    from aiida.engine.processes.calcjobs.monitors import CalcJobMonitorResult
    return CalcJobMonitorResult(override_exit_code=False)
Disable a monitor#
By default, when a monitor returns anything other than None, the engine will immediately kill the job.
In certain use-cases, a monitor may want to perform an action and then let the job terminate nominally, but not invoke the monitor again.
To disable a monitor, set CalcJobMonitorResult.action to the DISABLE_SELF option of the CalcJobMonitorAction:
def monitor_disable_self(node: CalcJobNode, transport: Transport) -> str | None:
    """Disable this monitor and let job terminate nominally."""
    from aiida.engine.processes.calcjobs.monitors import CalcJobMonitorResult, CalcJobMonitorAction
    return CalcJobMonitorResult(action=CalcJobMonitorAction.DISABLE_SELF)
All other monitors, if defined, will continue to be invoked by the engine.
Disable all monitors#
By default, when a monitor returns anything other than None, the engine will immediately kill the job.
In certain use-cases, a monitor may want to perform an action and then let the job terminate nominally.
An example might be where the monitor writes a sentinel file in the remote working directory, which will let the code running on the remote shut itself down gracefully.
In this case it is desirable that the engine stops calling the monitors that were registered and just let the job continue normally.
To disable all monitors, set CalcJobMonitorResult.action to the DISABLE_ALL option of the CalcJobMonitorAction:
def monitor_disable_all_monitors(node: CalcJobNode, transport: Transport) -> str | None:
    """Disable all monitors and let job terminate nominally."""
    from aiida.engine.processes.calcjobs.monitors import CalcJobMonitorResult, CalcJobMonitorAction
    return CalcJobMonitorResult(action=CalcJobMonitorAction.DISABLE_ALL)
How to save compute time with caching#
Over the course of a project, you may end up re-running the same calculations multiple times - be it because two workflows include the same calculation or because one needs to restart a workflow that failed due to some infrastructure problem.
Since AiiDA stores the full provenance of each calculation, it can detect whether a calculation has been run before and, instead of running it again, simply reuse its outputs, thereby saving valuable computational resources. This is what we mean by caching in AiiDA.
With caching enabled, AiiDA searches the database for a calculation of the same hash. If found, AiiDA creates a copy of the calculation node and its results, thus ensuring that the resulting provenance graph is independent of whether caching is enabled or not (see Fig. 3).
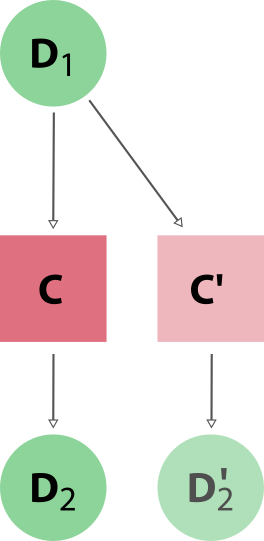
Fig. 3 When reusing the results of a calculation C for a new calculation C’, AiiDA simply makes a copy of the result nodes and links them up as usual. This diagram depicts the same input node D1 being used for both calculations, but an input node D1’ with the same hash as D1 would trigger the cache as well.#
Caching happens on the calculation level (no caching at the workflow level, see Limitations and Guidelines). By default, both successful and failed calculations enter the cache once they are finished. Excepted and killed calculations do not enter the cache (more details in Controlling Caching).
How to enable caching#
Important
Caching is not enabled by default, see the faq.
Caching is controlled on a per-profile level via the verdi config cli.
View your current caching configuration:
$ verdi config list caching
name                     source    value
-----------------------  --------  -------
caching.default_enabled  default   False
caching.disabled_for     default
caching.enabled_for      default
Enable caching for your current profile or globally (for all profiles):
$ verdi config set caching.default_enabled True
Success: 'caching.default_enabled' set to True for 'quicksetup' profile

$ verdi config set -g caching.default_enabled True
Success: 'caching.default_enabled' set to True globally

$ verdi config list caching
name                     source    value
-----------------------  --------  -------
caching.default_enabled  profile   True
caching.disabled_for     default
caching.enabled_for      default
Changed in version 1.6.0: Configuring caching via the cache_config.yml is deprecated as of AiiDA 1.6.0.
Existing cache_config.yml files will be migrated to the central config.json file automatically.
From this point onwards, when you launch a new calculation, AiiDA will compare its hash (a fixed size string, unique for a calulation’s type and inputs, see How are nodes hashed) against other calculations already present in your database. If another calculation with the same hash is found, AiiDA will reuse its results without repeating the actual calculation.
Note
In contrast to caching, hashing is enabled by default, i.e. hashes for all your calculations will already have been computed.
How to configure caching#
The caching mechanism can be configured on a process class level, meaning the rules will automatically be applied to all instances of the given class, or on a per-instance level, meaning it can be controlled for individual process instances when they are launch.
Class level#
Besides the on/off switch set by caching.default_enabled, caching can be controlled at the level of specific calculations using their corresponding entry point strings (see the output of verdi plugin list aiida.calculations):
$ verdi config set caching.disabled_for aiida.calculations:core.templatereplacer
Success: 'caching.disabled_for' set to ['aiida.calculations:core.templatereplacer'] for 'quicksetup' profile
$ verdi config set caching.enabled_for aiida.calculations:quantumespresso.pw
Success: 'caching.enabled_for' set to ['aiida.calculations:quantumespresso.pw'] for 'quicksetup' profile
$ verdi config set --append caching.enabled_for aiida.calculations:other
Success: 'caching.enabled_for' set to ['aiida.calculations:quantumespresso.pw', 'aiida.calculations:other'] for 'quicksetup' profile
$ verdi config list caching
name                     source    value
-----------------------  --------  -------------------------------------
caching.default_enabled  profile   True
caching.disabled_for     profile   aiida.calculations:core.templatereplacer
caching.enabled_for      profile   aiida.calculations:quantumespresso.pw
                                   aiida.calculations:other
In this example, caching is enabled by default, but explicitly disabled for calculations of the TemplatereplacerCalculation class, identified by its corresponding aiida.calculations:core.templatereplacer entry point string.
It also shows how to enable caching for particular calculations (which has no effect here due to the profile-wide default).
Note
It is also possible to provide the full import path of the class in case it does not have a registered entry point.
For example, if the class can be imported as from some.module.path import SomeClass, it can be added as:
verdi config set caching.enabled_for some.module.path.SomeClass
Tip
To set multiple entry-points at once, use a , delimiter.
Warning
If a specified value for verdi config set enabled_for/disabled_for is an entry point that cannot be loaded, or is a path that cannot be improted, an error is raised.
For the available entry-points in your environment, you can list which are enabled/disabled using:
$ verdi config caching
aiida.calculations:core.arithmetic.add
aiida.calculations:core.transfer
aiida.workflows:core.arithmetic.add_multiply
aiida.workflows:core.arithmetic.multiply_add
$ verdi config caching --disabled
aiida.calculations:core.templatereplacer
For calculations which do not have an entry point, you need to specify the fully qualified Python name instead.
For example, the seekpath_structure_analysis calcfunction defined in aiida_quantumespresso.workflows.functions.seekpath_structure_analysis is labelled as aiida_quantumespresso.workflows.functions.seekpath_structure_analysis.seekpath_structure_analysis.
From an existing CalculationNode, you can get the identifier string through the process_type attribute.
The caching configuration also accepts * wildcards.
For example, the following configuration disables caching for all calculation entry points.
$ verdi config set caching.disabled_for 'aiida.calculations:*'
Success: 'caching.disabled_for' set to ['aiida.calculations:*'] for 'quicksetup' profile
$ verdi config caching
aiida.workflows:core.arithmetic.add_multiply
aiida.workflows:core.arithmetic.multiply_add
$ verdi config caching --disabled
aiida.calculations:core.arithmetic.add
aiida.calculations:core.transfer
aiida.calculations:core.templatereplacer
Any entry with a wildcard is overridden by a more specific entry.
The following configuration disables caching for all aiida.calculation entry points, except those of arithmetic:
$ verdi config set caching.enabled_for 'aiida.calculations:core.arithmetic.*'
Success: 'caching.enabled_for' set to ['aiida.calculations:core.arithmetic.*'] for 'quicksetup' profile
$ verdi config list caching
name                     source    value
-----------------------  --------  -------------------------------
caching.default_enabled  profile   True
caching.disabled_for     profile   aiida.calculations:*
caching.enabled_for      profile   aiida.calculations:core.arithmetic.*
$ verdi config caching
aiida.calculations:core.arithmetic.add
aiida.workflows:core.arithmetic.add_multiply
aiida.workflows:core.arithmetic.multiply_add
$ verdi config caching --disabled
aiida.calculations:core.transfer
aiida.calculations:core.templatereplacer
Instance level#
Caching can be enabled or disabled on a case-by-case basis by using the enable_caching or disable_caching context manager, respectively, regardless of the profile settings:
from aiida.engine import run
from aiida.manage.caching import enable_caching
with enable_caching(identifier='aiida.calculations:core.templatereplacer'):
    run(...)
Warning
This affects only the current Python interpreter and won’t change the behavior of the daemon workers.
This means that this technique is only useful when using run, and not with submit.
By default, the enable_caching context manager will just validate that the identifier is syntactically valid.
It does not validate that the identifier points to a class or entry point that actually exists and can be imported or loaded.
To make sure that the specified identifier is known to AiiDA, pass the strict=True keyword argument:
from aiida.engine import run
from aiida.manage.caching import enable_caching
with enable_caching(identifier='aiida.calculations:core.templatereplacer', strict=True):
    run(...)
When strict is set to True, the function will raise a ValueError if the specified class or entry point cannot be imported or loaded.
Besides controlling which process classes are cached, it may be useful or necessary to control what already stored nodes are used as caching sources. Section Controlling Caching provides details how AiiDA decides which stored nodes are equivalent to the node being stored and which are considered valid caching sources.
Alternatively, if the cache should not be considered for a specific process, its metadata.disable_cache input can be set to True:
from aiida.engine import submit
submit(SomeProcess, inputs={'metadata': {'disable_cache': True}})
The advantage of this approach is that the disable_cache metadata input overrides all other configuration and controls of caching, so the process is guaranteed to not be taken from the cache.
Unlike the enable_caching and disable_caching context managers which only affect the local interpreter, this approach is respected by all interpreters.
This approach, therefore, is mostly useful when submitting processes to the daemon that should ignore the cache.