Workflows
Workflows are a central concept in AiiDA that allow you to string together multiple calculations that encodes the logic of a typical scientific workflow. In this section, we explain what workflows are, how they can be used and run. Finally, we will detail some best practices when designing workflows.
Workchains and workfunctions
At the core of a workflow, is the logic that defines the sequence of calculations that need to be executed to get from the initial inputs to the desired final answer. The way to encode this workflow logic in AiiDA, are workchains and workfunctions. By chaining workchains and workfunctions together, that each can run calculations within them, we can define a workflow. For simplicity, from here on out, we will use the terms, workflows, workchains and workfunctions interchangeably, as a ‘pars pro toto’ and ‘totum pro parte’.
Workfunctions
To illustrate how workfunctions and workchains are defined, how they are used and when to use which, we will consider the following trivial example. Given three integers, sum the first two and then multiply the result by the third. In plain python code, the solution would look something like the following:
# -*- coding: utf-8 -*-
a = 1
b = 2
c = 3

def add(a, b):
    return a + b

def multiply(a, b):
    return a * b

result = multiply(add(a, b), c)
This simple code snippet achieved the goal of getting the desired result, however, the provenance is lost.
There is no connection between the output of the functions and their inputs.
The remedy to this problem is the workfunction.
The workfunction in AiiDA is a decorator that transforms a regular python function in a workfunction, which automatically stores the provenance of its output.
The following snippet shows how little one has to change the initial solution to add automatic provenance keeping:
# -*- coding: utf-8 -*-
from aiida.engine import calcfunction

a = 1
b = 2
c = 3

@calcfunction
def add(a, b):
    return a + b

@calcfunction
def multiply(a, b):
    return a * b

result = multiply(add(a, b), c)
The only thing we had to do is to decorate the two functions with the workfunction decorator.
Adding the decorator tells AiiDA that the provenance for this function when it is executed should be stored.
This means linking up the inputs and the outputs for a calculation node, which represents the function that was executed.
The final change that has to be performed is to make the inputs and the outputs storable.
In this example, they are plain python integer types, which cannot be stored in the database.
To solve this, one only has to wrap them in the Int class, which makes them storable in the database:
# -*- coding: utf-8 -*-
from aiida.engine import calcfunction
from aiida.orm import Int

a = Int(1)
b = Int(2)
c = Int(3)


@calcfunction
def add(a, b):
    return Int(a + b)


@calcfunction
def multiply(a, b):
    return Int(a * b)


result = multiply(add(a, b), c)
The only difference with the previous snippet is that all inputs and outputs have been wrapped in the Int class.
With these trivial changes, the full provenance of the result is maintained and looks like this:
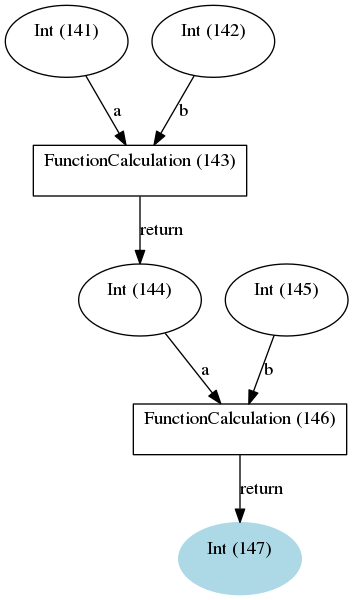
The provenance generated by the workfunction example
To summarize: to write a workflow that automatically stores the provenance, one only has to decorate the functions with the workfunction decorator and make sure that the inputs and outputs are wrapped in database storable types.
Workchains
Now that we have demonstrated how easily workfunctions can be used to write your workflow that automatically keeps the provenance, it is time to confess that workfunctions are not perfect and have their shortcomings.
In the simple example of adding and multiplying numbers, the time to execute the functions is very short, but imagine that you are performing a more costly calculation, e.g. you want to run an actual CalcJob that will be submitted to the scheduler and may run for a long time.
If anywhere during the chain, the workflow is interrupted, for whatever reason, all progress is lost.
There are no ‘checkpoints’, so to speak, by simply chaining workfunctions together.
But fret not!
To tackle this problem, AiiDA defines the concept of the workchain.
As the name suggests, this construct is a way to chain multiple logical steps of a workflow together in a way that allows to save the progress between those steps as soon as they are successfully completed.
The workchain is therefore the preferred solution for parts of the workflow that involve more expensive and complex calculations.
To define a workchain, AiiDA implements the WorkChain class.
If we were to reimplement our workfunction solution of the simple example problem of the previous section, but this time using a workchain, it would look something like the following:
# -*- coding: utf-8 -*-
from aiida.engine.workchain import WorkChain
from aiida.orm import Int


class AddAndMultiplyWorkChain(WorkChain):

    @classmethod
    def define(cls, spec):
        super(AddAndMultiplyWorkChain, cls).define(spec)
        spec.input('a', valid_type=Int)
        spec.input('b', valid_type=Int)
        spec.input('c', valid_type=Int)
        spec.outline(
            cls.add,
            cls.multiply,
            cls.results,
        )
        spec.output('result', valid_type=Int)

    def add(self):
        self.ctx.sum = self.inputs.a + self.inputs.b

    def multiply(self):
        self.ctx.product = self.ctx.sum * self.inputs.c

    def results(self):
        self.out('result', Int(self.ctx.product))
There is a lot going on in this snippet, so let’s tackle it line by line.
Firstly, a WorkChain is a class and to create your own workchain, you subclass it and give it your own name, like AddAndMultiplyWorkChain in the example.
You can pick any name that is a valid python class name.
The most important method of the WorkChain class, is the define class method.
Here you define, what inputs it takes, what outputs it will generate and the ‘logic’ that will be executed.
The class method takes two arguments:
clsthis is the reference of the class itself and is mandatory for any class methodspecwhich is the ‘specification’
Note
Do not forget to add the line super(AddAndMultiplyWorkChain, self).define(spec) as the first line of the define method, where you replace the class name with the name of your workchain.
This will call the define method of the parent class, which is necessary for the workchain to work properly
As the name suggests, the spec can be used to specify the properties of the workchain.
For example, it can be used to define inputs that the workchain takes.
In our example, we need to be able to pass three integers as input, so we define those in the spec by calling spec.input().
The first argument is the name of the input.
Additionally, as we have done here, you can specify which types are valid for that particular input.
Since we expect integers, we specify that the valid type is the database storable Int class.
Input validation is just one of the advantages of the WorkChain over the workfunction that we can already see here.
The outputs are defined in a similar manner, calling spec.output() you can declare a particular output that the workchain will or is expected to have.
Be wary that if you define an output, but do not actually add it during the exection, at the end of the workchain, the validation will fail as by default all defined outputs are assumed to be required.
If you want to specify an output that is optional, you can pass the keyword argument required=False.
The final part of the spec definition is the outline.
This is where you specify the ‘logic’ of the workchain.
Since this example is rather contrived, in this case it is just a list of three functions calls add, multiply and results.
However, the outline also supports logical constructs, like if conditionals while loops and return statements.
Refer to the advanced workchain section to see all the possibilities the outline provides.
The only thing that remains, is to implement the methods that we added to the outline.
Since they are class instance methods, they only take one argument self.
Besides that rule, you can add any valid python code in the method that you want.
The goal of the add method is to take the inputs a and b that are passed to the workchain and sum them.
The inputs passed to the workchain are stored in the inputs attribute as an attribute dictionary.
Therefore, to get the a input for example, you can call self.inputs.a.
After we summed a and b, we need to be able to store the temporary result and pass it to the next step in the outline, in this case the multiply method.
For this purpose, each workchain has a context, which can be addressed at self.ctx.
It is a dictionary that is persisted between workchain steps and can therefore be used to pass information and data between outline steps.
Since it is a dictionary, we can store the sum of a and b by assigning it to a key of our choice.
Again, any valid python key name, as long as it does do not contain a period, is fair game.
Note that we do not have to return anything, as soon as the function ends, the workchain will save its state, including the result we just stored in the context and go to the next step, the multiply method.
By now you should be familiar with what you see.
We retrieve the sum we computed in the add method, multiply it by the c input integer and store it under the product key in the context.
The final step results adds the product as an official output of the workchain by calling self.out().
The first argument is the name of the output, which will also be used for the linkname in the provenance graph and the second argument is the actual value.
Note that since it again has to be database storable, we wrap the product in the Int class.
The resulting provenance when we run this workchain looks like this:
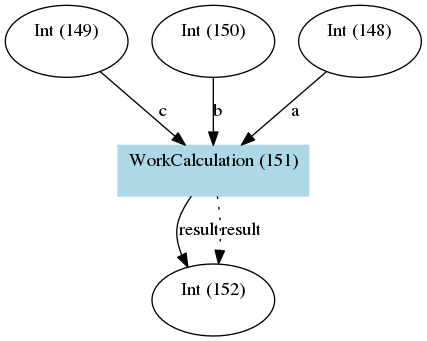
The provenance generated by the workchain example
This is very quick overview of how a workchain works but of course it has a lot more features. To learn how to write workchains for real life problems, continue reading at the workflow development section.
When to use which
Now that we know how the two workflow components, workflows and workchains, work in AiiDA, you might wonder: when should I use which one?
For simple operations that do not take long, the simplicity of the workfunction may be all you need, so by all means use it.
However, a good rule of thumb is that as soon as the code is expected to take longer, for example when you want to launch a CalcJob, it is always best to go for the WorkChain.
The automatic checkpointing, which guarantess that work between steps is saved, becomes very important.
The workchain offers a lot more features than checkpointing that may make it more preferable over the workfunction, which you can read about in the workflow development section.
Running workflows
Run
Without realizing it, in the introductory section on workfunctions and workchains, we already saw how a workfunction can be ran. We can run a workfunction in exactly the same manner as you would run any other python function. Simply call the function with the desired inputs and it will be executed, while AiiDA makes sure to store the provenance automatically in the background. You can run workfunctions from anywhere, also inside an outline step of a workchain.
Running a WorkChain on the other hand, is slightly different.
Since it is a class, it cannot be ‘run’ directly like a function.
Instead, we have to ‘launch’ it.
This is done by passing it to the run function:
# -*- coding: utf-8 -*-
from aiida.engine import run
from aiida.engine.workchain import WorkChain
from aiida.orm import Int


class AddAndMultiplyWorkChain(WorkChain):
    pass

result = run(AddAndMultiplyWorkChain, a=Int(1), b=Int(2), c=Int(3))
As you can see, the run function can be imported from aiida.engine.launch.
To launch the workchain (in this example we use the AddAndMultiplyWorkChain from the previous section), we simply call the run function with the workchain as the first argument, followed by the inputs as keyword arguments.
Note that the keys used for each input have to correspond to the name of the inputs defined in the spec of the workchain.
One can also define the inputs in a dictionary and then use the standard python expansion method to automatically unwrap the dictionary into keyword arguments, as is shown here:
# -*- coding: utf-8 -*-
from aiida.engine import run
from aiida.engine.workchain import WorkChain
from aiida.orm import Int


class AddAndMultiplyWorkChain(WorkChain):
    pass


inputs = {
    'a': Int(1),
    'b': Int(2),
    'c': Int(3)
}
result = run(AddAndMultiplyWorkChain, **inputs)
After the workchain’s execution is finished, the result is returned, which is a dictionary of its outputs.
In this example the variable result will therefore be equal to {'result': 9}.
If you would also like to get a reference of the node that represents the WorkChain in the database, one can use the run_get_node or run_get_pid functions:
# -*- coding: utf-8 -*-
from aiida.engine import run_get_node, run_get_pid
from aiida.engine.workchain import WorkChain
from aiida.orm import Int


class AddAndMultiplyWorkChain(WorkChain):
    pass


result, node = run_get_node(AddAndMultiplyWorkChain, a=Int(1), b=Int(2), c=Int(3))
result, pid = run_get_pid(AddAndMultiplyWorkChain, a=Int(1), b=Int(2), c=Int(3))
For the former, the node will be the WorkChainNode node that is used to represent the workchain in the database, whereas for the latter, the pid is the pk of that same node.
The run based functions can actually also be used for workfunctions.
Calling run with a workfunction, does exactly the same as running the workfunction directly as a normal python function and so doesn’t gain anything new.
However, if you are interested in also getting the calculation node or the pid of the process, in addition to the result of the function, calling the workfunction through run_get_node or run_get_pid is the correct solution.
Note that for workfunctions you can pass the inputs both as arguments as well as keyword arguments:
# -*- coding: utf-8 -*-
from aiida.engine import run_get_node, run_get_pid
from aiida.engine import calcfunction

a = 1
b = 2

@calcfunction
def add(a, b):
    return a + b

# Passing inputs as arguments
result, node = run_get_node(add, a, b)
result, pid = run_get_pid(add, a, b)

# Passing inputs as keyword arguments
result, node = run_get_node(add, a=a, b=b)
result, pid = run_get_pid(add, a=a, b=b)
Submit
The launch functions, run, run_get_node and run_get_pid, described in the previous section, will execute the process in a blocking manner.
That is to say that the interpreter in which you launch the process will be blocked until that process is completed.
This might not necessarily be what you want.
Imagine for example that you are launching a workchain that will take a long time to complete.
The interpreter will be blocked the whole time and cannot do anything else.
To circumvent this problem, you can also submit a process, for example a workchain:
# -*- coding: utf-8 -*-
from aiida.engine import submit
from aiida.engine.workchain import WorkChain
from aiida.orm import Int


class AddAndMultiplyWorkChain(WorkChain):
    pass

node = submit(AddAndMultiplyWorkChain, a=Int(1), b=Int(2), c=Int(3))
Note
Workfunctions cannot be submitted but can only be run
The submit function will launch the process and send it to the daemon, who will take care of running it to the end.
This way the interpreter is freed and regains control immediately.
The return value of the submit call is the node that represents the process in the database.
Note that besides the change in behavior, the syntax for passing the inputs to submit is exactly the same as for the run launch function and its siblings.
There is one limitation to the use of the run and submit launchers.
They cannot be used within the steps of a WorkChain itself.
Instead, the WorkChain class has its own submit method that should be used.
# -*- coding: utf-8 -*-
from aiida.engine.workchain import WorkChain
from aiida.orm import Int


class AddAndMultiplyWorkChain(WorkChain):

    def submit_sub_workchain(self):
        node = self.submit(AddAndMultiplyWorkChain, a=Int(1), b=Int(2), c=Int(3))
In this example, we launch another instance of the AddAndMultiplyWorkChain from within the AddAndMultiplyWorkChain itself.
The only difference is that, instead of using the free function submit, we use the class instance method self.submit.
Note that this example is oversimplified and additional steps are required to be able to continue the workchain after submitting the child workchain.
For more details, please refer to the advanced section on submitting calculations and workchains.
Note
When you submit a WorkChain or any other process over the daemon, you need to make sure that the daemon can find the class when it needs to load it.
Registering your class through the plugin system with a designated entry point is one way to make sure that the daemon will be able to find it.
If, however, you simply have a test class and do not want to go through the effort of creating an entry point for it, you should make sure that the module where you define the class is in the python path.
Process builder
There is one final way of launching a process, whether it be a WorkChain or a CalcJob.
Each process has a method called get_builder which will return an instance of the ProcessBuilder customised for that particular Process class.
The builder knows exactly which inputs the process takes and expects and is therefore ideal for interactive usage.
For details on how to instantiate and populate a ProcessBuilder instance please refer to the process builder section.
One you have constructed your builder and inserted all the inputs, you can pass it to the launch functions like we did in the previous two sections:
# -*- coding: utf-8 -*-
from aiida.engine import submit
from aiida.engine.workchain import WorkChain
from aiida.orm import Int


class AddAndMultiplyWorkChain(WorkChain):
    pass


builder = AddAndMultiplyWorkChain.get_builder()
builder.a = Int(1)
builder.b = Int(2)
builder.c = Int(3)

node = submit(builder)
Note that you are free to use this method of launching processes in normal scripts, but the builder really is designed for use in an interactive shell.
Monitoring workflows
When you have launched workflows, be it workfunctions or workchains, you may want to investigate their status, progression and the results.
verdi work list
Your first point of entry will be the verdi command verdi work list.
This command will print a list of all active WorkflowNode nodes, which are the database objects used by WorkChains and workfunctions to store the details of their execution in the database.
A typical example may look something like the following:
  PK  Creation    State           Process label
----  ----------  ------------    ----------------------
 151  3h ago      Running | None  AddAnMultiplyWorkChain
 156  1s ago      Created | None  AddAnMultiplyWorkChain


Total results: 2
The ‘State’ column is a concatenation of the process_state and the exit_status of the WorkflowNode.
By default, the command will only show active items, i.e. WorkflowNodes that have not yet reached a terminal state.
If you want to also show the nodes in a terminal states, you can use the -a flag and call verdi work list -a:
  PK  Creation    State           Process label
----  ----------  ------------    ----------------------
 143  3h ago      Finished | 0    add
 146  3h ago      Finished | 0    multiply
 151  3h ago      Running | None  AddAnMultiplyWorkChain
 156  1s ago      Created | None  AddAnMultiplyWorkChain


Total results: 4
For more information on the meaning of the ‘state’ column, please refer to the documentation of the process state.
The -S flag let’s you query for specific process states, i.e. issuing verdi work list -S created will return:
  PK  Creation    State           Process label
----  ----------  ------------    ----------------------
 156  1s ago      Created | None  AddAnMultiplyWorkChain


Total results: 1
To query for a specific exit status, one can use verdi work list -E 0:
  PK  Creation    State           Process label
----  ----------  ------------    ----------------------
 143  3h ago      Finished | 0    add
 146  3h ago      Finished | 0    multiply


Total results: 2
This simple tool should give you a good idea of the current status of running workflows and the status of terminated ones. If you are looking for information about a specific workflow node, the following three commands are at your disposal:
verdi work reportgives a list of the log messages attached to the workflowverdi work statusprint the call hierarchy of the workflow and status of all its nodesverdi calculation showprint details about the status, inputs, outputs, callers and callees of the workflow
In the following sections, we will explain briefly how the commands work.
For the purpose of example, we will show the output of the commands for a completed PwBaseWorkChain from the aiida-quantumespresso plugin, which simply calls a PwCalculation.
verdi work report
The developer of a WorkChain can attach log messages to the workchain at any place within the function body of one of the outline steps through the report() method.
The verdi work report command will display all the log messages in chronological order:
2018-04-08 21:18:51 [164 | REPORT]: [164|PwBaseWorkChain|run_calculation]: launching PwCalculation<167> iteration #1
2018-04-08 21:18:55 [164 | REPORT]: [164|PwBaseWorkChain|inspect_calculation]: PwCalculation<167> completed successfully
2018-04-08 21:18:56 [164 | REPORT]: [164|PwBaseWorkChain|results]: workchain completed after 1 iterations
2018-04-08 21:18:56 [164 | REPORT]: [164|PwBaseWorkChain|on_terminated]: remote folders will not be cleaned
The log message will include a timestamp followed by the level of the log, which is always REPORT.
The second block has the format pk|class name|step function name detailing information about the workchain itself and the step in which the message was fired.
Finally, the message itself is displayed.
Of course how many messages are logged and how useful they are is up to the workchain developer.
In general they can be very useful for a user to understand what has happened during the execution of the workchain, however, one has to realize that each entry is stored in the database, so overuse can unnecessarily bloat the database.
verdi work status
One of the more powerful aspect of workchains, is that they can call CalcJobs and other WorkChains to create a nested call hierarchy.
If you want to inspect the status of a workchain and all the children that it called, verdi work status is the go-to tool.
An example output is the following:
PwBaseWorkChain <pk=164> [ProcessState.FINISHED] [4:results]
    └── PwCalculation <pk=167> [FINISHED]
The command prints a tree representation of the hierarchical call structure, that recurses all the way down.
In this example, there is just a single PwBaseWorkChain which called a PwCalculation, which is indicated by it being indented one level.
In addition to the call tree, each node also shows its current process state and for workchains at which step in the outline it is.
This tool can be very useful to inspect while a workchain is running at which step in the outline it currently is, as well as the status of all the children calculations it called.
verdi work show
Finally, there is a command that displays detailed information about the WorkflowNode, such as its inputs, outputs and the calculations it called and was called by.
An example output for a PwBaseWorkChain would look like the following:
Property       Value
-------------  ------------------------------------
type           WorkChainNode
pk             164
uuid           08bc5a3c-da7d-44e0-a91c-dda9ddcb638b
label
description
ctime          2018-04-08 21:18:50.850361+02:00
mtime          2018-04-08 21:18:50.850372+02:00
process state  ProcessState.FINISHED
exit status    0
code           pw-v6.1

Inputs            PK  Type
--------------  ----  -------------
parameters       158  Dict
structure        140  StructureData
kpoints          159  KpointsData
pseudo_family    161  Str
max_iterations   163  Int
clean_workdir    160  Bool
options          162  Dict

Outputs              PK  Type
-----------------  ----  -------------
output_band         170  BandsData
remote_folder       168  RemoteData
output_parameters   171  Dict
output_array        172  ArrayData

Called      PK  Type
--------  ----  -------------
CALL       167  PwCalculation

Log messages
---------------------------------------------
There are 4 log messages for this calculation
Run 'verdi work report 164' to see them
This overview should give you all the information if you want to inspect a workchains inputs and outputs in closer detail as it provides you with their pk’s.
Workflow development
This section will be a more in-depth guide of all the features and tools that the workflow system of AiiDA provides.
Along the way, we will also highlight how one can use these tools to write maintanable, robust and modular workflows.
Just like the definition of a WorkChain, we will start with the process specification.
Process specification
The process specification of a workchain, implemented by the ProcessSpec, is the construct that is used to define the inputs, outputs and the logical outline of the workchain.
Defining this specification is therefore one of the more important steps of designing a workflow.
A very simple example of the definition of a workchain specification, in the define() method, was demonstrated in the introductory section on workchains.
In this section we will describe all the features of the process spec in more detail.
Ports and Portnamespaces
Two core concepts and components of the ProcessSpec that have remained hidden so far, but are crucial to understanding the functionality of the ProcessSpec, are that of the Port and the PortNamespace.
In the workchain introduction, we already saw how an input could be defined for the process spec:
spec.input('a')
What this directive really accomplishes, is that an InputPort is added to the inputs attribute of the ProcessSpec, which is a PortNamespace.
This PortNamespace is a simple namespace that contains all the InputPorts and can even have nested PortNamespaces.
This allows the designer of a workchain to create any nested structure for the input ports.
Creating a new namespace in the inputs namespace is as simple as:
spec.input_namespace('namespace')
This will create a new PortNamespace named namespace in the inputs namespace of the spec.
You can create arbitrarily nested namespaces in one statement, by separating them with a . as shown here:
spec.input_namespace('nested.namespace')
This command will result in the PortNamespace name namespace to be nested inside another PortNamespace called nested.
Note
Because the period is reserved to denote different nested namespaces, it cannot be used in the name of terminal input and output ports as that could be misinterpreted later as a port nested in a namespace.
Graphically, this can be visualized as a nested dictionary and will look like the following:
'inputs': {
    'nested': {
        'namespace': {}
    }
}
The outputs attribute of the ProcessSpec is also a PortNamespace just as the inputs, with the only different that it will create OutputPort instead of InputPort instances.
Therefore the same concept of nesting through PortNamespaces applies to the outputs of a ProcessSpec.
Validation and defaults
In the previous section, we saw that the ProcessSpec uses the PortNamespace, InputPort and OutputPort to define the inputs and outputs structure of the Process.
The underlying concept that allows this nesting of ports is that the PortNamespace, InputPort and OutputPort, are all a subclass of Port.
And as different subclasses of the same class, they have more properties and attributes in common, for example related to the concept of validation and default values.
All three have the following attributes (with the exception of the OutputPort not having a default attribute):
defaultrequiredvalid_typevalidator
These attributes can all be set upon construction of the port or after the fact, as long as the spec has not been sealed, which means that they can be altered without limit as long as it is within the define method of the corresponding Process.
An example input port that explicitly sets all these attributes is the following:
spec.input('positive_number', required=False, default=Int(1), valid_type=(Int, Float), validator=is_number_positive)
Here we define an input named positive_number that is not required, if a value is not explicitly passed, the default Int(1) will be used and if a value is passed, it should be of type Int or Float and it should be valid according to the is_number_positive validator.
Note that the validator is nothing more than a free function which takes a single argument, being the value that is to be validated and should return True if that value is valid or False otherwise.
The valid_type can define a single type, or a tuple of valid types.
Note that by default all ports are required, but specifying a default value implies that the input is not required and as such specifying required=False is not necessary in that case.
It was added to this example simply for clarity.
The validation of input or output values with respect to the specification of the corresponding port, happens at the instantiation of the process and when it is finalized, respectively.
If the inputs are invalid, a corresponding exception will be thrown and the process instantiation will fail.
When the outputs fail to be validated, likewise an exception will be thrown and the process state will be set to Excepted.
Dynamic namespaces
In the previous section we described the various attributes related to validation and claimed that all the port variants share those attributes, yet we only discussed the InputPort and OutputPort.
The statement, however, is still correct and the PortNamespace has the same attributes.
You might then wonder what the meaning is of a valid_type or default for a PortNamespace if all it does is contain InputPorts, OutputPorts or other PortNamespaces.
The answer to this question lies in the PortNamespace attribute dynamic.
Often when designing the specification of a Process, we cannot know exactly which inputs we want to be able to pass to the process.
However, with the concept of the InputPort and OutputPort one does need to know exactly, how many value one expects at least, as they do have to be defined.
This is where the dynamic attribute of the PortNamespace comes in.
By default this is set to False, but by setting it to True, one indicates that that namespace can take a number of values that is unknown at the time of definition of the specification.
This now explains the meaning of the valid_type, validator and default attributes in the context of the PortNamespace.
If you do mark a namespace as dynamic, you may still want to limit the set of values that are acceptable, which you can do by specifying the valid type and or validator.
The values that will eventually be passed to the port namespace will then be validated according to these rules exactly as a value for a regular input port would be.
Non storable inputs
In the introduction of this section on workflows, we mentioned that valid types for inputs and outputs should be AiiDA data types, as they can be stored in the database and that is the only way the provenance can be kept. However, there are cases where you might want to pass an input to a workchain, whose provenance you do not care about and therefore would want to pass a non-database storable type anyway.
Note
AiiDA allows you to break the provenance as to be not too restrictive, but always tries to urge you and guide you in a direction to keep the provenance. There are legitimate reasons to break it regardless, but make sure you think about the implications and whether you are really willing to lose the information.
For this situation, the InputPort has the attribute non_db.
By default this is set to False, but by setting it to True the port is marked that the values that are passed to it should not be stored as a node in the provenance graph and linked to the calculation node.
This allows one to pass any normal value that one would also be able to pass to a normal function.
Outline
After the ports, both input and output, have been specified, it is time to define the outline of the workchain. The outline describes the logical flow of the workchain, which makes it an extremely important part of the workchain design process. Since the goal of a workchain should be to execute a very well defined task, it is the goal of the outline to capture the required logic to achieve that goal, in a clear and short yet not overly succint manner. The outline supports various logical flow constructs, such as conditionals and while loops, so where possible this logic should be expressed in the outline and not in the body of the outline functions. However, one can also go overboard and put too finely grained logical blocks into the outline, causing it to become bulky and difficult to understand.
A good rule of thumb in designing the outline is the following: before you start designing a workchain, define very clearly the task that it should carry out. Once the goal is clear, draw a schematic block diagram of the necessary steps and logical decisions that connect them, in order to accomplish that goal. Converting the resulting flow diagram in a one-to-one fashion into an outline, often results in very reasonable outline designs.
The currently available logical constructs for the workchain outline are:
if,elif,elsewhilereturn
To distinguish these constructs from the python builtins, they are suffixed with an underscore, like so while_.
To use these in your workchain design, you will have to import them:
from aiida.engine import if_, while_, return_
The following example shows how to use these logical constructs to define the outline of a workchain:
spec.outline(
    cls.intialize_to_zero,
    while_(cls.n_is_less_than_hundred)(
        if_(cls.n_is_multitple_of_three)(
            cls.report_fizz,
        ).elif_(cls.n_is_multiple_of_five)(
            cls.report_buzz,
        ).elif_(cls.n_is_multiple_of_three_and_five)(
            cls.report_fizz_buzz,
        ).else_(
            cls.report_n,
        )
    ),
    cls.increment_n_by_one,
)
This is an implementation (and an extremely contrived one at that) of the well known FizzBuzz problem.
The idea is that the program is supposed to print in sequence the numbers from zero to some limit, except when the number is a multiple of three Fizz is printed, for a multiple of five Buzz and when it is a multiple of both, the program should print FizzBuzz.
The actual implementation of the outline steps themselves is now trivial:
def initialize_to_zero(self):
    self.ctx.n = 0

def n_is_less_than_hundred(self):
    return self.ctx.n < 100

def n_is_multiple_of_three(self):
    return self.ctx.n % 3 == 0

def n_is_multiple_of_five(self):
    return self.ctx.n % 5 == 0

def n_is_multiple_of_three_and_five(self):
    return self.ctx.n % 3 == 0 and self.ctx.n % 5 == 0

def increment_n_by_one(self):
    self.ctx.n += 1
The intention of this example is to show that with a well designed outline, a user only has to look at the outline to have a good idea what the workchain does and how it does it. One should not have to look at the implementation of the outline steps as all the important information is captured by the outline itself.
Exit codes
Any WorkChain most likely will have one or multiple expected failure modes.
To clearly communicate to the caller what went wrong, the WorkChain supports setting its exit_status.
This exit_status, a positive integer, is an attribute of the calculation node and by convention, when it is zero means the process was successful, whereas any other value indicates failure.
This concept of an exit code, with a positive integer as the exit status, is a common concept in programming and a standard way for programs to communicate the result of their execution.
Potential exit codes for the WorkChain can be defined through the ProcessSpec, just like inputs and ouputs.
Any exit code consists of a positive non-zero integer, a string label to reference it and a more detailed description of the problem that triggers the exit code.
Consider the following example:
spec.exit_code(418, 'ERROR_I_AM_A_TEAPOT', 'the workchain had an identity crisis')
This defines an exit code for the WorkChain with exit status 418 and exit message the workchain had an identity crisis.
The string ERROR_I_AM_A_TEAPOT is a label that the developer can use to reference this particular exit code somewhere in the WorkChain code itself.
A detailed explanation of how this is accomplished will be explained in a later section.
Whenever a WorkChain exits through a particular error code, the caller will be able to introspect it through the exit_status and exit_message attributes of the node.
Assume for example that we ran a WorkChain that threw the exit code described above, the caller would be able to do the following:
in[1] workchain = load_node(<pk>)
in[2] workchain.exit_status
out[2] 418
in[2] workchain.exit_message
out[2] 'the workchain had an identity crisis'
This is useful, because the caller can now programmatically, based on the exit_status, decide how to proceed.
This is an infinitely more robust way of communcating specific errors to a non-human then parsing text based logs or reports (see the section on reporting).
Reporting
During the execution of a WorkChain, we may want to keep the user abreast of its progress and what is happening.
For this purpose, the WorkChain implements the report() method, which functions as a logger of sorts.
It takes a single argument, a string, that is the message that needs to be reported:
def submit_calculation(self):
    self.report('here we will submit a calculation')
This will send that message to the internal logger of python, which will cause it to be picked up by the default AiiDA logger, but it will also trigger the database log handler, which will store the message in the database and link it to the node of the workchain.
This allows the verdi work report command to retrieve all those messages that were fired using the report method for a specific WorkflowNode.
Note that the report method, in addition to the pk of the workchain, will also automatically record the name of the workchain and the name of the outline step in which the report message was fired.
This information will show up in the output of verdi work report, so you never have to explicitly reference the workchain name, outline step name or date and time in the message itself.
It is important to note that the report system is a form of logging and as such has been designed to be read by humans only. That is to say, the report system is not designed to pass information programmatically by parsing the log messages.
Context
In the simplest workchain example presented in the introductory section, we already saw how the context can be used to persist information during the execution of a workchain and pass it between outline steps. The context is essentially a data container, very similar to a dictionary that can hold all sorts of data. The workflow engine will ensure that its contents are saved and persisted in between steps and when the daemon shuts down or restarts. A trivial example of this would be the following:
def step_one(self):
    self.ctx.some_variable = 'store me in the context'

def step_two(self):
    assert self.ctx.some_variable == 'store me in the context'
In the step_one outline step we store the string store me in the context in the context, which can be addressed as self.ctx, under the key some_variable.
Note that for the key you can use anything that would be a valid key for a normal python dictionary.
In the second outline step step_two, we can verify that the string was successfully persisted, by checking the value stored in the context self.ctx.some_variable.
This was just a simple example to introduce the concept of the context, however, it really is one of the more important parts of the workchain.
The context really becomes crucial when you want to submit a calculation or another workchain from within the workchain.
How this is accomplished, we will show in the next section.
Submitting calculations and workchains
One of the main tasks of a WorkChain will be to launch a CalcJob or even another WorkChain.
An example in the section on running workflows already showed that the WorkChain class provides the submit() method, to submit another WorkChain or CalcJob to the daemon.
However, that is not enough to complete the process.
When the submit method is called, the process is created and submitted to the daemon, but at that point it is not yet done.
So the value that is returned by the submit call is not the result of the submitted process, but rather it is a future.
When the process is terminated, this future will then be transformed into the results of the process, however, until this happens, the workchain cannot continue: it has to wait for the process to be finished.
To do this, control has to be returned to the workflow engine, which can then, when the process is completed, call the next step in the outline, where we can analyse the results.
To context
In order to store the future of the submitted process, we can store it in the context with a special construct that will tell the workflow engine that it should wait for that process to finish before continuing the workchain. To illustrate how this works, consider the following minimal example:
# -*- coding: utf-8 -*-
from aiida.engine.workchain import WorkChain, ToContext


class SomeWorkChain(WorkChain):

    @classmethod
    def define(cls, spec):
        super(SomeWorkChain, cls).define(spec)
        spec.outline(
            cls.submit_workchain,
            cls.inspect_workchain,
        )

    def submit_workchain(self):
        future = self.submit(SomeWorkChain)
        return ToContext(workchain=future)

    def inspect_workchain(self):
        assert self.ctx.workchain.is_finished_ok
As explained in the previous section, calling self.submit for a given process that you want to submit, will return a future.
To add this future to the context, we can not access the context directly as explained in the context section, but rather we need to use the class ToContext.
This class has to be imported from the aiida.engine module.
To add the future to the context, simply construct an instance of ToContext, passing the future as a keyword argument, and returning it from the outline step.
The keyword used, workchain in this example, will be the key used under which to store the node in the context once its execution has terminated.
Returning an instance of ToContext signals to the workflow engine that it has to wait for the futures contained within it to finish execution, store their nodes in the context under the specified keys and then continue to the next step in the outline.
In this example, that is the inspect_workchain method.
At this point we are sure that the process, a workchain in this case, has terminated its execution, although not necessarily successful, and we can continue the logic of the workchain.
Sometimes one wants to launch not just one, but multiple processes at the same time that can run in parallel.
With the mechanism described above, this will not be possible since after submitting a single process and returning the ToContext instance, the workchain has to wait for the process to be finished before it can continue.
To solve this problem, there is another way to add futures to the context:
# -*- coding: utf-8 -*-
from aiida.engine.workchain import WorkChain


class SomeWorkChain(WorkChain):

    @classmethod
    def define(cls, spec):
        super(SomeWorkChain, cls).define(spec)
        spec.outline(
            cls.submit_workchains,
            cls.inspect_workchains,
        )

    def submit_workchains(self):
        for i in range(3):
            future = self.submit(SomeWorkChain)
            key = 'workchain_{}'.format(i)
            self.to_context(**{key: future})

    def inspect_workchains(self):
        for i in range(3):
            key = 'workchain_{}'.format(i)
            assert self.ctx[key].is_finished_ok
Here we submit three workchains in a for loop in a single outline step, but instead of returning an instance of ToContext, we call the to_context() method.
This method has exactly the same syntax as the ToContext class, except it is not necessary to return its value, so we can call it multiple times in one outline step.
Under the hood the functionality is also the same as the ToContext class.
At the end of the submit_workchains outline step, the workflow engine will find the futures that were added by calling to_context and will wait for all of them to be finished.
The good thing here is that these three sub workchains can be run in parallel and once all of them are done, the parent workchain will go to the next step, which is inspect_workchains.
There we can find the nodes of the workchains in the context under the key that was used as the keyword argument in the to_context call in the previous step.
Since we do not want the subsequent calls of to_context to override the previous future, we had to create unique keys to store them under.
In this example, we chose to use the index of the for-loop.
The name carries no meaning and is just required to guarantee unique key names.
This pattern will occur often where you will want to launch multiple workchains or calculations in parallel and will have to come up with unique names.
In essence, however, you are really just creating a list and it would be better to be able to create a list in the context and simply append the future to that list as you submit them.
How this can be achieved is explained in the next section.
Appending
When you want to add a future of a submitted sub process to the context, but append it to a list rather than assign it to a key, you can use the append_() function.
Consider the example from the previous section, but now we will use the append_ function instead:
# -*- coding: utf-8 -*-
from aiida.engine.workchain import WorkChain, append_


class SomeWorkChain(WorkChain):

    @classmethod
    def define(cls, spec):
        super(SomeWorkChain, cls).define(spec)
        spec.outline(
            cls.submit_workchains,
            cls.inspect_workchains,
        )

    def submit_workchains(self):
        for i in range(3):
            future = self.submit(SomeWorkChain)
            self.to_context(workchains=append_(future))

    def inspect_workchains(self):
        for workchain in self.ctx.workchains:
            assert workchain.is_finished_ok
Notice that in the submit_workchains step we no longer have to generate a unique key based on the index but we simply wrap the future in the append_ function and assign it to the generic key workchains.
The workflow engine will see the append_ function and instead of assigning the node corresponding to the future to the key workchains, it will append it to the list stored under that key.
If the list did not yet exist, it will automatically be created.
The self.ctx.workchains now contains a list with the nodes of the completed workchains and so in the inspect_workchains step we can simply iterate over it to access all of them in order.
Note that the use of append_ is not just limited to the to_context method.
You can also use it in exactly the same way with ToContext to append a process to a list in the context in multiple outline steps.
Aborting and exit codes
At the end of every outline step, the return value will be inspected by the workflow engine.
If a non-zero integer value is detected, the workflow engine will interpret this as an exit code and will stop the execution of the workchain, while setting its process state to Finished.
In addition, the integer return value will be set as the exit_status of the workchain, which combined with the Finished process state will denote that the worchain is considered to be Failed, as explained in the section on the process state.
This is useful because it allows a workflow designer to easily exit from a workchain and use the return value to communicate programmatically the reason for the workchain stopping.
We assume that you have read the section on how to define exit code through the process specification of the workchain. Consider the following example workchain that defines such an exit code:
spec.exit_code(400, 'ERROR_CALCULATION_FAILED', 'the child calculation did not finish successfully')
Now imagine that in the outline, we launch a calculation and in the next step check whether it finished successfully.
In the event that the calculation did not finish successfully, the following snippet shows how you can retrieve the corresponding exit code and abort the WorkChain by returning it:
def submit_calculation(self):
    inputs = {'code': code}
    future = self.submit(SomeCalcJob, **inputs)
    return ToContext(calculation=future)

def inspect_calculation(self):
    if not self.ctx.calculation.is_finished_ok:
        self.report('the calculation did not finish successfully, there is nothing we can do')
        return self.exit_codes.ERROR_CALCULATION_FAILED

    self.report('the calculation finished successfully')
In the inspect_calculation outline, we retrieve the calculation that was submitted and added to the context in the previous step and check if it finished successfully through the property is_finished_ok.
If this returns False, in this example we simply fire a report message and return the exit code corresponding to the label ERROR_CALCULATION_FAILED.
Note that the specific exit code can be retrieved through the WorkChain property exit_codes.
This will return a collection of exit codes that have been defined for that WorkChain and any specific exit code can then be retrieved by accessing it as an attribute.
Returning this exit code, which will be an instance of the ExitCode named tuple, will cause the workchain to be aborted and the exit_status and exit_message to be set on the node, which were defined in the spec.
Note
The notation self.exit_codes.ERROR_CALCULATION_FAILED is just syntactic sugar to retrieve the ExitCode tuple that was defined in the spec with that error label.
Constructing your own ExitCode directly and returning that from the outline step will have exactly the same effect in terms of aborting the workchain execution and setting the exit status and message.
However, it is strongly advised to define the exit code through the spec and retrieve it through the self.exit_codes collection, as that makes it easily retrievable through the spec by the caller of the workchain.
The best part about this method of aborting a workchains execution, is that the exit status can now be used programmatically, by for example a parent workchain.
Imagine that a parent workchain submitted this workchain.
After it has terminated its execution, the parent workchain will want to know what happened to the child workchain.
As already noted in the report section, the report messages of the workchain should not be used.
The exit status, however, is a perfect way.
The parent workchain can easily request the exit status of the child workchain through the exit_status property, and based on its value determine how to proceed.
Workfunction exit codes
The method of setting the exit status for a WorkChain by returning an ExitCode, as explained in the previous section, works almost exactly the same for workfunctions.
The only difference is that for a workfunction, we do not have access to the convenience exit_codes property of the WorkChain, but rather we have to import and return an ExitCode ourselves.
This named tuple can be constructed with an integer, to denote the desired exit status and an optional message, and when returned, the workflow engine will mark the node of the workfunction as Finished and set the exit status and message to the value of the tuple.
Consider the following example:
@workfunction
def exiting_workfunction():
    from aiida.engine import ExitCode
    return ExitCode(418, 'I am a teapot')
The execution of the workfunction will be immediately terminated as soon as the tuple is returned, and the exit status and message will be set to 418 and I am a teapot, respectively.
Since no output nodes are returned, the WorkFunctionNode node will have no outputs and the value returned from the function call will be an empty dictionary.
Modular workflow design
When creating complex workflows, it is a good idea to split them up into smaller, modular parts. At the lowest level, each workflow should perform exactly one task. These workflows can then be wrapped together by a “parent” workflow to create a larger logical unit.
In order to make this approach manageable, it needs to be as simple as possible to glue together multiple workflows in a larger parent workflow. One of the tools that AiiDA provides to simplify this is the ability to expose the ports of another workchain.
Exposing inputs and outputs
Consider the following example workchain, which simply takes a few inputs and returns them again as outputs:
# -*- coding: utf-8 -*-
from aiida.orm import Bool, Float, Int
from aiida.engine import WorkChain


class ChildWorkChain(WorkChain):

    @classmethod
    def define(cls, spec):
        super(ChildWorkChain, cls).define(spec)
        spec.input('a', valid_type=Int)
        spec.input('b', valid_type=Float)
        spec.input('c', valid_type=Bool)
        spec.outline(cls.do_run)
        spec.output('d', valid_type=Int)
        spec.output('e', valid_type=Float)
        spec.output('f', valid_type=Bool)

    def do_run(self):
        self.out('d', self.inputs.a)
        self.out('e', self.inputs.b)
        self.out('f', self.inputs.c)
As a first example, we will implement a thin wrapper workflow, which simply forwards its inputs to ChildWorkChain, and forwards the outputs of the child to its outputs:
# -*- coding: utf-8 -*-
from aiida.engine import ToContext, WorkChain, run
from child import ChildWorkChain


class SimpleParentWorkChain(WorkChain):

    @classmethod
    def define(cls, spec):
        super(SimpleParentWorkChain, cls).define(spec)
        spec.expose_inputs(ChildWorkChain)
        spec.expose_outputs(ChildWorkChain)
        spec.outline(cls.run_child, cls.finalize)

    def run_child(self):
        child = self.submit(ChildWorkChain, **self.exposed_inputs(ChildWorkChain))
        return ToContext(child=child)

    def finalize(self):
        self.out_many(
            self.exposed_outputs(self.ctx.child, ChildWorkChain)
        )
In the define method of this simple parent workchain, we use the expose_inputs() and expose_outputs().
This creates the corresponding input and output ports in the parent workchain.
Additionally, AiiDA remembers which inputs and outputs were exposed from that particular workchain class.
This is used when calling the child in the run_child method.
The exposed_inputs() method returns a dictionary of inputs that the parent received which were exposed from the child, and so it can be used to pass these on to the child.
Finally, in the finalize method, we use exposed_outputs() to retrieve the outputs of the child which were exposed to the parent.
Using out_many(), these outputs are added to the outputs of the parent workchain.
This workchain can now be run in exactly the same way as the child itself:
#!/usr/bin/env runaiida
# -*- coding: utf-8 -*-
from __future__ import print_function

from aiida.orm import Bool, Float, Int
from aiida.engine import run
from simple_parent import SimpleParentWorkChain

if __name__ == '__main__':
    result = run(SimpleParentWorkChain, a=Int(1), b=Float(1.2), c=Bool(True))
    print(result)
    # {u'e': 1.2, u'd': 1, u'f': True}
Next, we will see how a more complex parent workchain can be created by using the additional features of the expose functionality.
The following workchain launches two children.
These children share the input a, but have different b and c.
The output e will be taken only from the first child, whereas d and f are taken from both children.
In order to avoid name conflicts, we need to create a namespace for each of the two children, where the inputs and outputs which are not shared are stored.
Our goal is that the workflow can be called as follows:
#!/usr/bin/env runaiida
# -*- coding: utf-8 -*-
from __future__ import print_function

from aiida.orm import Bool, Float, Int
from aiida.engine import run
from complex_parent import ComplexParentWorkChain

if __name__ == '__main__':
    result = run(
        ComplexParentWorkChain,
        a=Int(1),
        child_1=dict(b=Float(1.2), c=Bool(True)),
        child_2=dict(b=Float(2.3), c=Bool(False))
    )
    print(result)
    # {
    #     u'e': 1.2,
    #     u'child_1.d': 1, u'child_1.f': True,
    #     u'child_2.d': 1, u'child_2.f': False
    # }
This is achieved by the following workflow. In the next section, we will explain each of the steps.
# -*- coding: utf-8 -*-
from aiida.engine import ToContext, WorkChain, run

from child import ChildWorkChain

class ComplexParentWorkChain(WorkChain):
    @classmethod
    def define(cls, spec):
        super(ComplexParentWorkChain, cls).define(spec)
        spec.expose_inputs(ChildWorkChain, include=['a'])
        spec.expose_inputs(ChildWorkChain, namespace='child_1', exclude=['a'])
        spec.expose_inputs(ChildWorkChain, namespace='child_2', exclude=['a'])
        spec.outline(cls.run_children, cls.finalize)
        spec.expose_outputs(ChildWorkChain, include=['e'])
        spec.expose_outputs(ChildWorkChain, namespace='child_1', exclude=['e'])
        spec.expose_outputs(ChildWorkChain, namespace='child_2', exclude=['e'])


    def run_children(self):
        child_1_inputs = self.exposed_inputs(ChildWorkChain, namespace='child_1')
        child_2_inputs = self.exposed_inputs(ChildWorkChain, namespace='child_2', agglomerate=False)
        child_1 = self.submit(ChildWorkChain, **child_1_inputs)
        child_2 = self.submit(ChildWorkChain, a=self.inputs.a, **child_2_inputs)
        return ToContext(child_1=child_1, child_2=child_2)

    def finalize(self):
        self.out_many(
            self.exposed_outputs(
                self.ctx.child_1,
                ChildWorkChain,
                namespace='child_1'
            )
        )
        self.out_many(
            self.exposed_outputs(
                self.ctx.child_2,
                ChildWorkChain,
                namespace='child_2',
                agglomerate=False
            )
        )
First of all, we want to expose the a input and the e output at the top-level.
For this, we again use expose_inputs() and expose_outputs(), but with the optional keyword include.
This specifies a list of keys, and only inputs or outputs which are in that list will be exposed.
So by passing include=['a'] to expose_inputs(), only the input a is exposed.
Additionally, we want to expose the inputs b and c (outputs d and f), but in a namespace specific for each of the two children.
For this purpose, we pass the namespace parameter to the expose functions.
However, since we now shouldn’t expose a (e) again, we use the exclude keyword, which specifies a list of keys that will not be exposed.
When calling the children, we again use the exposed_inputs() method to forward the exposed inputs.
Since the inputs b and c are now in a specific namespace, we need to pass this namespace as an additional parameter.
By default, exposed_inputs() will search through all the parent namespaces of the given namespace to search for input, as shown in the call for child_1.
If the same input key exists in multiple namespaces, the input in the lowest namespace takes precedence.
It’s also possible to disable this behavior, and instead search only in the explicit namespace that was passed.
This is done by setting agglomerate=False, as shown in the call to child_2.
Of course, we then need to explicitly pass the input a.
Finally, we use exposed_outputs() and out_many() to forward the outputs of the children to the outputs of the parent.
Again, the namespace and agglomerate options can be used to select which outputs are returned by the exposed_outputs() method.
Automatic input serialization
Quite often, inputs which are given as Python data types need to be cast to the corresponding AiiDA type before passing them to a workflow. Doing this manually can be cumbersome, so you can define a function which does this automatically when defining the input spec. This function, passed as serializer parameter to spec.input, is invoked if the given input is not already an AiiDA type.
For inputs which are stored in the database (non_db=False), the serialization function should return an AiiDA data type. For non_db inputs, the function must be idempotent because it might be applied more than once.
The following example workchain takes three inputs a, b, c, and simply returns the given inputs. The aiida.orm.nodes.data.base.to_aiida_type() function is used as serialization function.
# -*- coding: utf-8 -*-
from aiida.engine import WorkChain
from aiida.orm.nodes.data import to_aiida_type
# The basic types need to be loaded such that they are registered with
# the 'to_aiida_type' function.
from aiida.orm.nodes.data.base import *


class SerializeWorkChain(WorkChain):

    @classmethod
    def define(cls, spec):
        super(SerializeWorkChain, cls).define(spec)

        spec.input('a', serializer=to_aiida_type)
        spec.input('b', serializer=to_aiida_type)
        spec.input('c', serializer=to_aiida_type)

        spec.outline(cls.echo)

    def echo(self):
        self.out('a', self.inputs.a)
        self.out('b', self.inputs.b)
        self.out('c', self.inputs.c)
This workchain can now be called with native Python types, which will automatically converted to AiiDA types by the aiida.orm.nodes.data.base.to_aiida_type() function. Note that the module which defines the corresponding AiiDA type must be loaded for it to be recognized by aiida.orm.nodes.data.base.to_aiida_type().
#!/usr/bin/env runaiida
# -*- coding: utf-8 -*-

from __future__ import print_function

from aiida.engine import run

from serialize_workchain import SerializeWorkChain

if __name__ == '__main__':
    print(run(
        SerializeWorkChain,
        a=1, b=1.2, c=True
    ))
    # Result: {'a': 1, 'b': 1.2, 'c': True}
Of course, you can also use the serialization feature to perform a more complex serialization of the inputs.
Upgrading workchains from pre v1.0.0
The release of version 1.0.0 of aiida-core saw some major changes to the workflow engine to improve its robustness and userfriendliness.
In doing so a few minor changes were introduced that break workchains that were written before that release.
However, these workchains can be updated with just a few minor updates that we will list here:
- The free function
submitin anyWorkChainshould be replaced withself.submit. - The
_optionsinput forCalcJobis nowoptions, simply removed the leading underscore. - The
labelanddescriptioninputs forCalcJobor aWorkChainhave also lost the underscore. - The free functions from
aiida.work.launchandaiida.work.runhave been moved toaiida.engine.launch. - The future returned by
submitno longer has thepidattribute but ratherpk. - The
get_inputs_template classmethod has been replaced byget_builder. See the section on the process builder on how to use it. - The import
aiida.work.workfunctionhas been moved toaiida.engine.processes.functions.workfunction. - The
input_grouphas been deprecated and been replaced by namespaces. See the section on port namespaces on how to use them. - The use of a
.(period) in output keys is not supported inProcess.outbecause that is now reserved to indicate namespaces. - The method
ArrayData.iterarrayas()has been renamed toArrayData.get_iterarrays(). - The method
TrajectoryData._get_cif()has been renamed toTrajectoryData.get_cif(). - The method
TrajectoryData._get_aiida_structure()has been renamed toTrajectoryData.get_structure(). - The method
StructureData._get_cif()has been renamed toStructureData.get_cif(). - The method
Code.full_text_info()has been renamed toCode.get_full_text_info(). - The method
Code.is_hidden()has been changed and is now accessed through theCode.hiddenproperty. - The method
RemoteData.is_empty()has been changes and is now accessed through theRemoteData.is_empty. - The method
.is_alloy()for classesStructureDataandKindis now accessed through the.is_alloyproperty. - The method
.has_vacancies()for classesStructureDataandKindis now accessed through the.has_vacanciesproperty. - The arguments
stepidsandcellsof theTrajectoryData.set_trajectory()method are made optional which has implications on the ordering of the arguments passed to this method. - The list of atomic symbols for trajectories is no longer stored as array data but is now accessible through the
TrajectoryData.symbolsattribute.